| String
Tying
Ever break a string and not know what to do? Ever have someone show
you how to tie a knot in the end of your string and then not remember
how to do it? Or not understand it in the first place? I can't guarantee
that you'll get it this time, but let's try. I have been giving
this workshop at the Somerset Harp Conferences for the past few
years and many people have come up to me to say they finally understood
how to put on a string. I hope I can teach you.
As a disclaimer, I would like to say that there are many ways to tie
harp strings. I'm not saying that this is the only way, nor am I saying
that it is the best way. It's just the way that I have found to be the
least troublesome and most successful for me. From that standpoint,
we shall proceed.
Getting Started
Just for practice, cut yourself a piece of clear
nylon string, let's say .032, about a foot long. If you are really
changing a string, then don't cut off a piece, use the whole length
of string.Then cut a tiny piece of let's say red .055 about an inch
long. This will be your end stick. You can reverse these colors if
you like, but it will be easier to talk about it with 2 different colors.
You'll also need some small
needle nose pliers that you can find at the hardware
store or you can purchase here today.
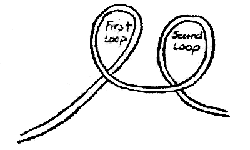
| Now, looking at the drawing on the right, loop your string so
it looks just like the picture. You'll need to make the second loop
opposite from the first loop so that it makes a mirror image. Make
sure the "smile" is in the front. Also think of the longer
side of the string on the left and the shorter end on the right.
The left end will be the side that actually goes
into the harp and up to the tuning pin. Get it? Hope so. |
 |
| From the back of the first loop, put the second loop through the
first loop. |
 |
| Pull the LEFT end of the string tight. I have drawn it a little
loose, but you pull yours tight. |
 |
| Get the little 1 inch red stick and slip it through the front
of the remaining large loop (originally our second loop). |
 |
| Holding the stick in place, pull the string to tighten the loop
onto the stick. |
 |
| Now, holding the stick in place, grab a pair of needle nose pliers
and pull the string, that's holding the stick, very tight. It should
actually turn the stick clockwise thus securing the knot and making
it so the stick won't fall out. Cut the end leaving about a 1/2
inch to avoid possible buzzing. |
 |
You can then thread your string into the hole in the back
of the harp and up to the tuning pin (see the first helpful hint for
an easier way). If the red end stick didn't turn then it is apt to fall
out while you thread the string through the hole.
Other helpful hints
- When you're replacing the highest strings, you may have noticed
that it is difficult to find the string hole from inside the sound
box. One thing you can do is, before you tie your end knot, thread
the string through the soundboard hole from the front of your soundboard.
Pull the string through the back sound holes and then make your knot.
This will only work if your string is long enough to allow you to
make the knot without pulling it through the string hole. You may
not understand what I'm talking about, but if it happens to you, I
think you'll understand.
- You may not need to use string ends for the higher gauge strings
like from .045 on up. Follow directions to figure 3, pull the left
string tight and string it on up. If the knot comes through the grommet,
you'll have to use a string end. Make sure it is stiff enough so as
not to bend as you tighten the loop.
- Another thing you can use for a string end is leather shoelaces
cut into1 inch lengths. I have never tried toothpicks but I have
heard they would work. The stick between the cotton of Q-tips could
also work. In a pinch, you might need to get creative.
Let me know if you come up with some great idea.
Tying the string onto the tuning
pin
Now that you’ve got the knot tied at the end of the string, you’ll
need to thread it through the tuning pin. Here’s what I do to
cinch the knot on this end. This works for all strings but the bass
wires (see below for these strings).
• Line up the hole of the tuning pin so that it is vertical. Standing
behind the harp, thread the string through the hole (it should be going
straight up through the hole in the tuning pin) and pull it back towards
you.
• Then slip the string below the tuning pin, between the wooden
neck of the harp and the string you just threaded up through the tuning
pin. You will be pushing the string toward the front of the harp now.
• Bring it up between the tuning pin you’re stringing and
the tuning pin of the string one note below and pull it out away from
the harp.
• Begin tuning up the string. The first wind should catch around the
end of the string. Make sure your winds go toward the neck of the
harp as you tune (unless your pins are the type of pin that wants
you to make the winds go away from the neck. I believe Tripplet pins
are like this, usually the string hole of the tuning pin is close to
the neck).
• Using the cutters of the needle nose pliers, cut off all of the extra
string to avoid any buzzing and to keep your harp tidy.
The Bass Wires
Pull the bass wire all the way
through the tuning pin straight up. Cut it off 2"-2 1/2" above
the tuning pin. Push it back down so it is ALMOST flush with the
tuning pin, just barely sticking out (less than the width of the
string). Begin winding the slack around the tuning pin until you
have it to pitch. This method helps to cut down on sharp edges cutting
you or your case.
Tuning up new strings
New strings will need to stretch before they will
hold a pitch for any length of time. You might want to over tune the
string about 20-50 cents and then stretch it a little. It will again
fall way below pitch. Do this a couple of times being careful not to
stretch or over tune the string too much or it may break. If you are
in the middle of a performance, you’ll need to get it to hold
pitch before you play so keep talking to the audience while you stretch
and tune, stretch and tune.
I hope this has helped to get you on your way to tying harp strings.
If you have questions, find me and I'll
help you out. If you already have a way that works for you, or if you
find a better way, wonderful!
Trouble Shooting Some String
Problems
Continued String Breakage
If the string breaks continually at the point of contact with the tuning
pin, you might have a sharp edge where the string goes through the hole.
To compensate for this, you can leave about a 1/2-1inch of slack before
tuning up the string. This eases the point where it is sharp and usually
takes care of the problem. And you can turn the tuning pin over so the
sharp edge is on the other side.
The same might be true for strings that break at the soundboard. The
bottom of the grommet may be cutting the string below the soundboard.
To help this situation, put a leather washer between your string knot
and the soundboard. You will need to put the washer on before you
tie the string. You can get leather washers from Robinson's String
Shop in California. (619 473-8556). Or you can use a wad of cotton.
If the string is breaking right above the soundboard you may need a
new grommet, also available from Robinson's although you'll need to
know if your grommet is small, medium, or large and if it is regular
or heavy duty (they are not interchangeable).
If your string pops off the
bridge pin
If there are too many winds of the string on the tuning pin, it may
cause it to pop off the bridge pin. As the string stretches and
tunes up to pitch, you may acquire more windings on the tuning pin
then you want. The string is at too steep of an angle to the bridge
pin and when you lever that string, it pops off the bridge pin. The
solution is to completely unwind the string until it is going straight
up out of the hole of the tuning pin. Pull it up through the tuning
pin about 1/2 inch, re-wind the string and tune it back up. Cut off
the extra 1/2 inch of string. This should take at least 1 wind out
of the string and it should stay on the bridge pin.
If your tuning pins slip
Sometimes a tuning pin will slip due to changes
in humidity. Most tuning pins are tapered like violin tuning pins.
The pin gets larger in diameter on the side that the tuning key fits
into. If you have a tapered tuning pin that keeps slipping, de-tune
the string about a half of a turn and then as you turn the pin to
tune the string back up, push the pin in. You should provide counter
pressure by bracing the neck of the harp with your left hand, while
pushing in with the key in your right. |