|
Boxing A Harp
in Your Thormahlen Shipping Box

The harp in the box weighs 45 lbs for a Swan, 43 lbs
for a Cygnet or a Clare, and 40 lbs for a Serenade or Ceili.
If you already have one of our shipping boxes, here is
how to put it all back together.
Don’t loosen the harp strings. Keeping them taught
keeps the harp from bumping up against itself.
Put the blue foam pieces in the top and bottom ends of the box,
Lay the bubble wrap in the box extending it over the foam.
Put the harp in its case and place the harp in the box on top of the
bubble wrap.
Fold the rest of the bubble wrap over the top of the harp.
Tuck the bubble wrap in along the front and back.
Put the first lid on the box and follow the tape marks that are there
to retape the box using 2" packing tape.
Turn the box over and put the next layer of box on top, again follow
the tape marks
Turn the box over one more time and put the final top on.
Tape the box completely shut running along every side of the box with
1 layer of tape over the opening.
Then run a second layer a little to the left to secure the first strip
of tape in place.
Then run a third layer a little to the right to secure the first strip
of tape on the other side.
Tape is cheap so use a lot of it. Make sure to tape the corners.
I hope this last part makes sense. Call if you need more explanation.
Please do not fill the box with peanuts - use bubble
wrap. Thank you.
Here is what to do if you don't have a shipping box.
Making A Box
I start with a table made of a 4' x 8' sheet of 1/2” plywood
on fold up sawhorses. The materials for the box are four 4' x 8' sheets
of cardboard, 10’ of 1/2” x 48” bubble wrap and
a couple of pieces of 2 inch “polyplank” recycled closed
cell foam. This is held together with 1/2” staples and 2” packing
tape. We get our supplies delivered in large quantities by “Boxmaker.”
I’m not really aware of the availability of small quantities,
but you can always improvise with the materials you can find.
The tools required consist of:
a retractable utility knife,
a tape gun,
a ¾” x ¾”" x 6’ stick and
a saber-point stapler. You may have trouble finding this
but it should be available from the same folks you get your packing
supplies from.
After shipping many harps, I finally devised a template
to make my cuts in the cardboard. I’ll describe the process that
led to making the template. If you plan to ship a lot of instruments
that are the same size, it’s well worth having a template. If
you’re only shipping one harp or if you have a few harps that
are different sizes, you’ll just want to build the box around
the harp.
I strongly recommend shipping your harp in a high quality padded case.
In our experience harps shipped without a case have a lot higher probability
of being damaged in shipping simply because they are not properly padded.
To design a template, I lay a piece of masonite on my table, then I
put the harp in its case on top of the masonite. If I was
boxing a unique harp, I’d just put the harp on top of the
first piece of cardboard. Place the harp in the center of the cardboard
or masonite.
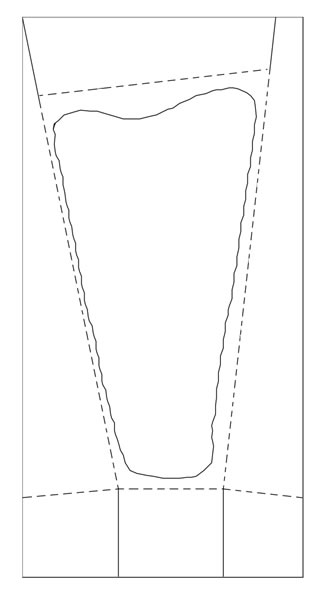
You’ll notice that the harp is roughly shaped like a triangle
with the point at the bottom flattened. Locate the harp on the cardboard
so it’s pretty much centered, when laying on its side. You can
center it properly with a couple of measurements. To score the cardboard
so you can fold it neatly, simply retract the blade in the utility knife
and pretend to cut along the line. The base of my harp is roughly 18”
x 12” when it’s in the case, so I start by scoring a 12”
line that’s 18” from one end of the cardboard and centered
across the width of the cardboard. Since I use 2” thick foam at
the base, I locate the base of the harp in its case 2” from the
12” scored line.
Now I lay the stick along the long edges of the case. With my harp,
I build the box so that the side of the box that goes across the top
of the neck is a rectangle. To do this the distance from the edge of
the cardboard to the front and the back of the harp case should be the
same. When I get the harp centered, I score the lines along the front
and back of the harp using the stick as a guide.

I use a 12” x 18” piece of foam at the base,
so I can lay it along the edge centered across the width of the cardboard
then cut along the two 18” edges. These cuts will intersect with
the 12” line scored first and the long scored lines along the
front and back of the harp.
Now we can fold the cardboard along the 3 scored lines. Fold up the
bottom flap so it holds the foam against the base of the harp. Then
fold up the front flap of the box. Holding these two flaps up, score
the front flap where it overhangs past the bottom flap. You can now
fold this flap over and staple it to the bottom flap where this flap
hangs over the back edge of the bottom flap. You should trim it flush
with the utility knife. Then fold up the back flap and score it, fold
it over and staple it to the bottom flap, then trim it flush with the
front edge.
Now you’ve got 3 sides of the box made. Take the harp out and
lay the bubble wrap in. Place the harp back in the box on top of the
bubble wrap and fold the rest of the bubble wrap over the top of the
harp. Cut to length, and tuck the bubble wrap in along the front and
back. If necessary, you can cut the bubble wrap and fold it in around
the knee block area.
With the harp in it’s case surrounded by bubble wrap snug it toward
the bottom flap. Hold the long piece of 2” foam along the top
of the neck of the harp and score a line that connects with the long
front and back lines. Now you can cut along these front and back lines
where they extend beyond the top line. You’ll need to make one
more cut at 90-degrees to the top line at the end where it meets the
front line. Now you can fold up the top flap and cut it flush with the
top edge of the 2” foam. Fold the ends of the front and back flaps
around the top flap and staple in place.
Now you’ve got half the box made. Use it as a template to score
your lines for the other half. Lay the 1/2 box on top of another sheet
of cardboard, center it as before and score and cut like we did on the
first half.
Take this second sheet of cardboard out from under the 1/2 box you have
made and put it on top of the open side of the 1/2 box. Fold the front
and back flaps down forming a loose lid on the box.
Now comes the hardest part of the whole process. Holding the loose lid
in place, you have to flip the whole box so the second sheet is now
under the open side of the original 1/2 box. Once you have flipped the
box, you reposition it so the front and back flaps fold up neatly. You
can fold up the front or back flap and hold it in place with a couple
of pieces of tape. Then fold, staple and trim the bottom flaps as we
did on the first sheet. Up at the top of the harp, (along the neck)
you can also fold, staple and trim as on the initial 1/2 box. You can
use the saber point on the stapler to puncture the cardboard and get
more staples into the flaps.
We repeat this process 2 more times so we have two complete layers of
cardboard around the harp. After the final sheet of cardboard is in
place, we use 2” packing tape to seal up all of the openings and
any exposed edges of cardboard. I figure the tape is pretty cheap so
I use a lot of it.
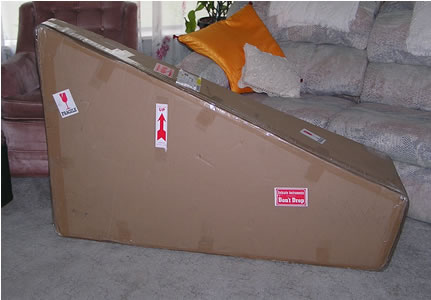
We plaster the box with “Up” arrows and “Fragile”
stickers. We also have stickers that say, “Delicate Instruments,
Do Not Drop.” I’m not sure the trucking guys pay much
attention to these, but we try. When the harps get to their destination,
all that needs to be done is to cut the tape and take the boxes apart
layer by layer. You can then put the boxes back together for storage
and reuse, or you can flatten the cardboard and recycle it. We recommend
saving the boxes in case you ever need it again.
Good luck and happy shipping.

The harp in the box weighs 45 lbs for a Swan, 43 lbs
for a Cygnet or a Clare, and 40 lbs for a Serenade or Ceili.
|


