Tuning
Your Harp
We all love tuning, right? Wrong! Even so, you must admit
your harp sounds way better when it's in tune. Here are some tricks
for making tuning easier and faster for you.
The Tuner
The first step in beginning your tuning adventure is to get an electronic
tuner that is going to work for you. It only takes a little time to
get used to a tuner, and that always makes the task easier.
Prices
for tuners range from under $25 to well over $100. The larger
the array of lights, the finer your tuning can be. You can see just
how far off you are and turn the tuning pin the appropriate amount.
Needle tuners are usually too jumpy for me, but the combination
of the
lights
and the needle available in the Korg CA-1($25) to the left works well.
The more expensive tuners last longer than the less expensive tuners
and they are rated for a larger note range. If your tuner doesn't
pick up the high notes, sometimes attaching the mic clip (see next
paragraph) directly to the tuning pin will allow the tuner to pick
it up. Below are the
DT-4 ($25) and the TM-50
metronome/tuner ($30). There are also many apps for smart phones
you can use for tuning your harp. just
how far off you are and turn the tuning pin the appropriate amount.
Needle tuners are usually too jumpy for me, but the combination
of the
lights
and the needle available in the Korg CA-1($25) to the left works well.
The more expensive tuners last longer than the less expensive tuners
and they are rated for a larger note range. If your tuner doesn't
pick up the high notes, sometimes attaching the mic clip (see next
paragraph) directly to the tuning pin will allow the tuner to pick
it up. Below are the
DT-4 ($25) and the TM-50
metronome/tuner ($30). There are also many apps for smart phones
you can use for tuning your harp.
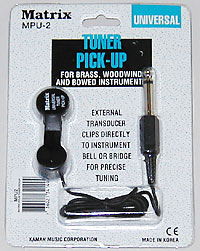 Mic
Clip Mic
Clip
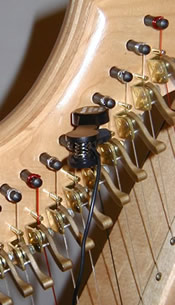
A mic clip is an essential item. It clips onto the
instrument and plugs into the tuner. It allows the tuner to hear the
note more clearly and keeps it from hearing extraneous noises, especially
when tuning in workshop groups. ($15, Only $10 when bought with a
tuner).
Tuning your harp
If you have a mic clip, find a place on your harp like the T-brace
in front or a sound hole in the back to clip it to. (see photos
below.) It won’t hurt the finish on your harp because it’s
padded. Place your tuner on a chair, your music stand or on the
floor. I often see people trying to tune holding their tuner in
their left hand. Nope! Don’t do this, it will hinder the speed
at which you can tune.
I tune with the levers down. Especially in the wound strings, if you
tune with a lever up, one of the windings may get caught so that when
you lower your lever, you won’t have a true pitch anymore.
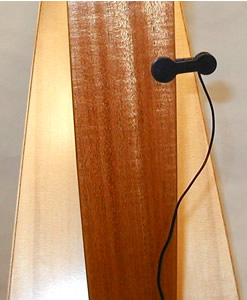 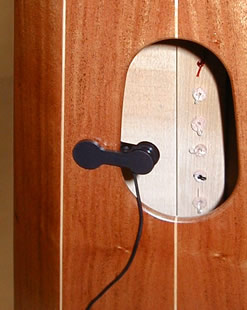
Mic clip on the T-brace or in soundhole
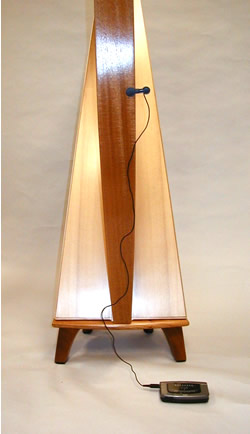
Tuner on the floor
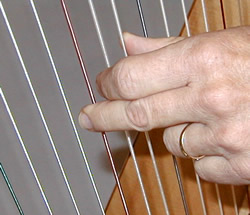 I
start at the bottom and move up by placing 3 fingers on the lowest
3 strings with the 3rd finger of my left hand. If that is a C on your
harp, then you would be on C, D, E, (thumb on E.) Even though the
picture shows my fingers on the 2nd from the bottom C, start at the
very bottom of your harp. For the first string only, pluck with your
3rd finger to tune. From then on it will be your 2nd finger. Your 3rd
finger and thumb will serve to dampen the adjacent notes which will
keep the overtones in check, and they will hold your place on the strings
so you don’t
have to guess which string it was you were tuning. Then you just walk
up the strings as each string is tuned, moving your thumb up one string
and following with the other 2 fingers. I
start at the bottom and move up by placing 3 fingers on the lowest
3 strings with the 3rd finger of my left hand. If that is a C on your
harp, then you would be on C, D, E, (thumb on E.) Even though the
picture shows my fingers on the 2nd from the bottom C, start at the
very bottom of your harp. For the first string only, pluck with your
3rd finger to tune. From then on it will be your 2nd finger. Your 3rd
finger and thumb will serve to dampen the adjacent notes which will
keep the overtones in check, and they will hold your place on the strings
so you don’t
have to guess which string it was you were tuning. Then you just walk
up the strings as each string is tuned, moving your thumb up one string
and following with the other 2 fingers.
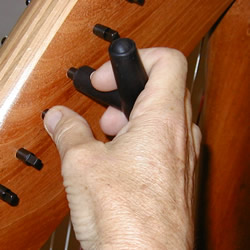 Now
for your right hand and the tuning key. I would suggest that you never
leave your tuning key on the tuning peg without your hand on it. If
it should fall off, you could have a big dent in your soundboard.
I have seen very experienced harp players do this and I cringe every
time. Now
for your right hand and the tuning key. I would suggest that you never
leave your tuning key on the tuning peg without your hand on it. If
it should fall off, you could have a big dent in your soundboard.
I have seen very experienced harp players do this and I cringe every
time.
Once you have the tuning key on the lowest tuning peg, don’t
let your hand leave the harp neck. When it’s time to “walk”
up the neck with your 3 fingers, feel for the next tuning peg with
your right hand thumb. Fit the tuning key onto that peg. You should
be able to do this without looking. That way you can keep your eyes
on the tuner. Even if most of your harp is perfectly in tune, when
you get to that one string that’s off, your tuning key will
be in place, and you won’t have to try to figure out which tuning
peg holds which string. You will already be there, because you have
followed up the neck moving your right hand and tuning key each time
you plucked a new string with your left hand. However, if you are turning
the tuning pin and nothing seems to be happening, STOP, and check to
make sure you haven’t
gotten out of line with the string. It still can happen.
The lights and/or needle will give you a clue as to how far out of
tune the string is. Usually the “dead center” light
will be a different color, say green and the sharp or flat lights
will be red. If the green light is on, but so is one of the red lights
to the left (or if the needle is just to the left of center), then
you know you are just a hair flat. Turn the key to sharpen the string
just a little tiny bit. If the green light is on with a red light
to the right (or if the needle is just to the right of center), then
you’re
a hair sharp, and sometimes pulling on the string a little bit will
bring the string to pitch. If that doesn't work, loosen the
tuning peg just a hair. You may then have to tighten the string again
as you may have fallen below pitch. If only red lights to the left
or right are on, then you know you can turn the tuning peg a bit
sharp or flat to get on pitch. Getting a feel for how much
to turn the tuning peg takes some practice. It’ll get easier
and faster the more you do it.
Occasionally a tuner will be stubborn and not register a note. It picked
it up yesterday, but today it’s on strike against that note.
I try a few different things at this point. I pluck louder,
I pluck on a different part of the string, I quiet all the strings
on the harp by damping them with my arm (especially the bass wires),
or I as I mentioned, move the mic clip.The most
successful place to move the mic clip is right onto the tuning pin
of that string. I also might tune that string by ear to the same
note in the octave below. I have gotten quite good at that with
practice, although I tend to tune them a tad sharp. This also works
easiest in the highest octave, but once you are good at that, the
lower octaves become easier too.
Most tuners will indicate which note the harp string is sounding. Make
sure you are tuning to the correct note. Sometimes your tuner might
register one of the overtones of that string. So if you’re
trying to tune an E, it might show up as a B on the tuner. It is
obviously not a B because you can hear it, right? You actually
can tune to that overtone and just get the B to come up to pitch.
Or again you can pluck louder, on a different part of the string,
quiet the harp, move the mic clip right on to the tuning peg for
that string, or tune by ear using octaves.
I hope this helps you to tune your harp quicker, easier, and more accurately.
Your harp will thank you, your audience will thank you, and your
harpbuilder will thank you.
For more extensive tuning instructions and
harp care you can check out Steve Moss's videos at:
How
to Tune Your Harp, Part 1
How to Tune
Your Harp, Part 2
How to Clean Your Harp
All About Harp
Strings
See some suggestions on string
tying
and trouble shooting, go back to the strings
page
or go on to the page About Harps.
 To
continue on the journey, find out more About
Harps in general. This is a very brief history. You'll also find
a "Parts of a Harp" diagram at the bottom of that page. To
continue on the journey, find out more About
Harps in general. This is a very brief history. You'll also find
a "Parts of a Harp" diagram at the bottom of that page.
|

 just
how far off you are and turn the tuning pin the appropriate amount.
Needle tuners are usually too jumpy for me, but the combination
of the
lights
and the needle available in the Korg CA-1($25) to the left works well.
The more expensive tuners last longer than the less expensive tuners
and they are rated for a larger note range. If your tuner doesn't
pick up the high notes, sometimes attaching the mic clip (see next
paragraph) directly to the tuning pin will allow the tuner to pick
it up. Below are the
DT-4 ($25) and the TM-50
metronome/tuner ($30). There are also many apps for smart phones
you can use for tuning your harp.
 Mic
Clip


 I
start at the bottom and move up by placing 3 fingers on the lowest
3 strings with the 3rd finger of my left hand. If that is a C on your
harp, then you would be on C, D, E, (thumb on E.) Even though the
picture shows my fingers on the 2nd from the bottom C, start at the
very bottom of your harp. For the first string only, pluck with your
3rd finger to tune. From then on it will be your 2nd finger. Your 3rd
finger and thumb will serve to dampen the adjacent notes which will
keep the overtones in check, and they will hold your place on the strings
so you don’t
have to guess which string it was you were tuning. Then you just walk
up the strings as each string is tuned, moving your thumb up one string
and following with the other 2 fingers.
 Now
for your right hand and the tuning key. I would suggest that you never
leave your tuning key on the tuning peg without your hand on it. If
it should fall off, you could have a big dent in your soundboard.
I have seen very experienced harp players do this and I cringe every
time.